Using a Smart host smtp relay to send your emails as an Exchange user isn’t easy. W’re here help you. Choose your Exchange version and follow the corresponding instructions:
Exchange 2003 Smart Host smtp relay
If you have an Exchange 2003 account and want to use Turbo SMTP as your Smart host email relay to send your emails and improve your deliverability, here’s how to do it:
- Open the Exchange System Manager
- To the left of the servers click the plus button (+) and expand the Organization -> Protocols > SMTP
- Select Properties by right-clicking the default SMTP Virtual Server
- Select the Outbound Security button from the Delivery tab
- Select the Basic Authentication option then the Requires TLS encryption check-box. Finally enter Consumer Key and Consumer Secret (see how to create your API Keys)
- Click the Advanced button
- Complete the Smart host field with pro.turbo-smtp.com and click OK
To expand the Connectors folder:
- Right click the SMTP Connector and select Properties to expand the Connectors folder
- Select Forward all mail through this connector to the following smart hosts on the General tab, then enter your account’s SMTP server and click OK
- Select ETRN/TURN on the Advanced tab and click Outbound security
- Click Basis Authentication, then Modify. Finally enter Consumer Key and Consumer Secret (see how to create your API Keys) and click OK
Exchange 2007 and 2010 Smart host smtp relay
If you have a Microsoft Exchange 2007 or 2010 account, you’ll need to configure a send connector in the Exchange Management Console to use Turbo SMTP as your Exchange Smart Host email relay:
- Log in to your Exchange 2010
- Starting from the main menu, follow the path: Start > All Programs > Microsoft Exchange Server 2010 > Exchange Management Console
- Select Hub Transport from the Organization Configuration list
- From the Action sidebar click New Sender Connector
- Give a name to the Second Connector, choose Internet from the drop-down menu, followed by Intended Use, then click Next. This action will allow Exchange to send messages through an external Smart Host
- Click Add to add the addresses or the domains to which the send connector will be authorized to send emails. If you want to authorize the send connector to send messages to everyone on the internet put a “*” in the address space. Click Next
- Select Route mail through the following smart hosts from the Network settings page and click Add
- Select the Fully qualified domain name (FQDN) and paste pro.turbo-smtp.com
- In the Configure smart host authentication settings page select the Basic Authentication option then the Basic Authentication over TLS. Finally write Consumer Key and Consumer Secret (see how to create your API Keys) and click Next
- Your Exchange server should appear automatically. To use other servers in your domain click Add to include them. Now proceed by click Next
- Check the settings and click New
- If the configuration is successful click Finish
Exchange 2016 and 2019 Smart host smtp relay
For the newest versions of Exchange follow these steps. You will need a sender connector for this version.
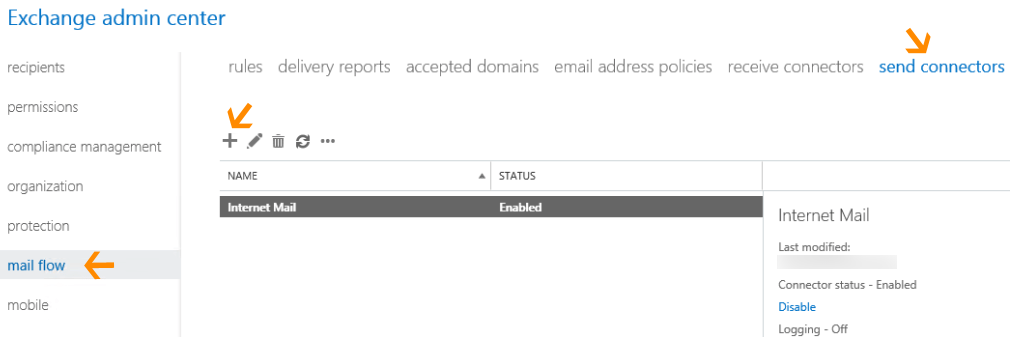
- Open the Exchange Control Panel
- Login as Administrator
- Follow the path Mail flow > Send connector > +
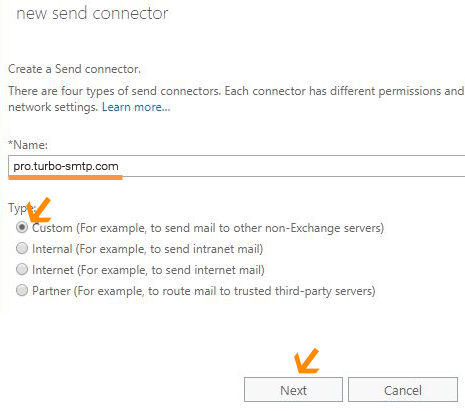
- Complete the Name field with pro.turbo-smtp.com. From the Type menu select Custom and click Next
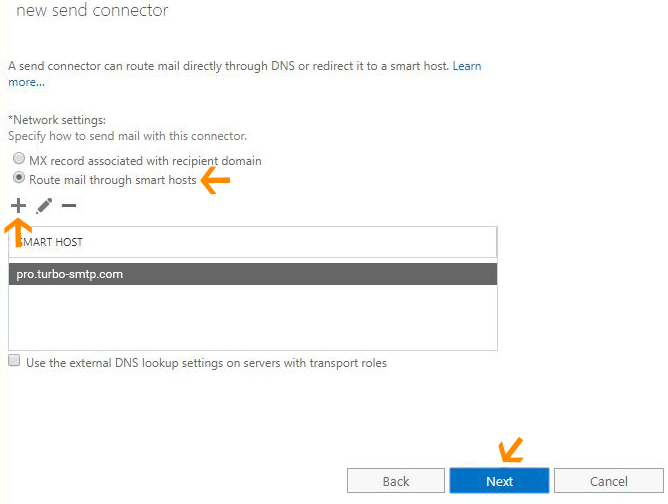
- Select Route mail through smart hosts
- Click Add (+), enter pro.turbo-smtp.com and save. Click Next
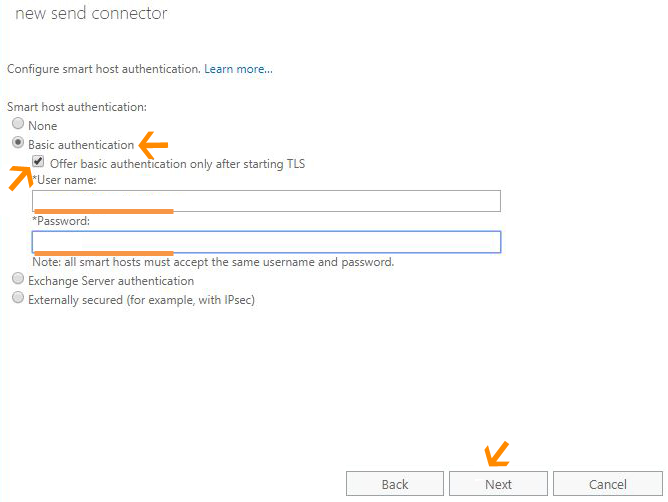
- Go to Basic Authentication, start the TLS, enter Consumer Key and Consumer Secret (see how to create your API Keys) and click Next
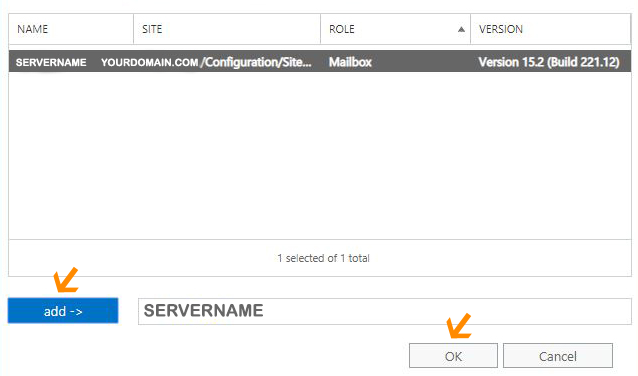
- Now you have to select the mailbox servers you want to use to send outbound mail to turboSMTP. Go to Source Server and add them (+)
- Finally click Finish
