Setting an SMTP server for Android is necessary to send out and deliver your emails from your phone or tablet: but don’t worry, the whole email setup is not difficult and it’ll take just a minute.
Just remember that if you are using a common SMTP server – like the one that comes with your account on Gmail or Hotmail – you will need to change these settings any time you switch to another ISP.
So if you are a frequent traveller, you should opt for a dedicated SMTP service: you configure its parameters just once and it’ll work with any kind of connection.
And here’s the procedure:
1. Press “Menu” and tap “Accounts”.
2. Press “Menu” again and tap “Add account”; then enter your email and password, and tap “Next”.
3. Set your incoming settings (IMAP or POP), and then enter your SMTP settings:
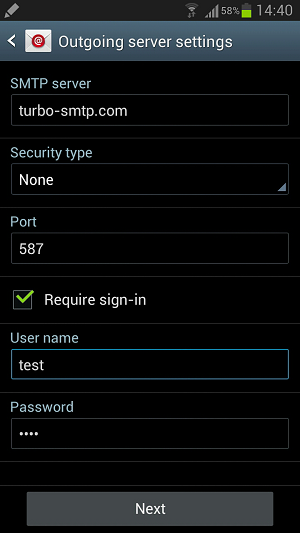
- SMTP server: your outgoing server’s name. If you don’t know it, you can check our handy list of SMTP settings.
- Security type: “none” to send without any added security layer; or (as we suggest) you can choose among different type of secured sending.
- Require sign-in: check it if you want to sign in with a password before sending emails.
- Port: the default port is 25, but you can choose also 587 or 465 if you’re sending out via SSL. For further information check our article about ports for SMTP.
- User name: your email address.
- Password: your password.
And that’s it, your email setup is done and you’re ready to send out messages.